 |
 |
 |
 |
 |
 |
 |
|
|
|
 |
|
|
 |
|
2. Elevation
2.1. Leonardo da Vinci. In the illustrations that Leonardo da Vinci made for Luca Pacioli’s book
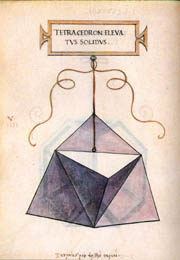
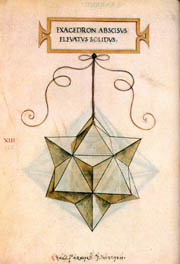
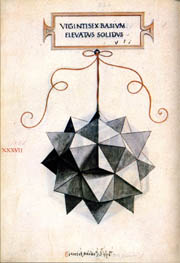
&La Divina Proportione” [2], we can find a remarkable step towards non-flat tiling. This step is called “Elevation” and Leonardo da Vinci applied it to almost every regular and semi-regular polyhedron. What we mean by Elevation can be comprehended when we look at Figure’s 8, 9 and 10.
|
|
|
 |
 |
|
|
 |
|
 |
|
 |
|
|
|
Figure 8: Tetrahedron elevated
|
Figure 9: Cuboctahedron elevated
|
Figure 10: Rhombic cuboctahedron elevated
|
|
 |
2.2. The elevation Process. The process of elevation of a polyhedron can be described as follows: from a face of the polyhedron we take the midpoint and we move this point away from the centre of the polyhedron until the distance between this point and the corner points of the face equals the length of the side of the face. After that we draw a line between the elevated point and each of the corner points of the face. When we do this for each face of the polyhedron the result will be the elevation of the polyhedron.
In Figure 8 we can see the result of this process when we start with the tetrahedron. Because the new faces are all equilateral triangles it is clear that this process only works on triangular, square and pentagonal faces. In Leonardo’s drawings we can find eight of the fourteen possible elevations of regular and semiregular polyhedra. Two of the elevated Archimedean solids are shown in Figure 9 and 10.
|
|
|
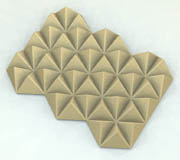
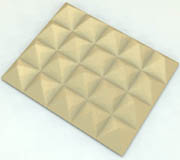
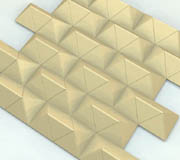
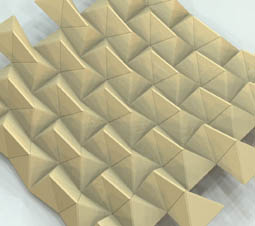
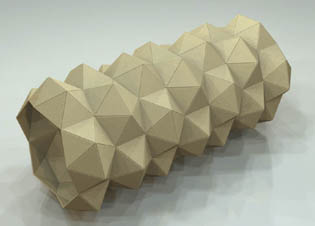
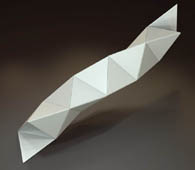
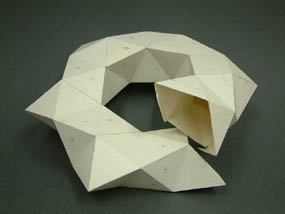
2.3. The Elevation of flat tilings. The process of elevation that Leonardo used to create a new set of monohedra can also be applied on flat tilings in which triangles or squares are used. In Figures 11 and 12 we can see the non-flat tilings we get when we apply the elevation process to the regular tilings by triangles and squares respectively. The resulting tiling is always a non-flat tiling in which only one type of tile is used, the equilateral triangle. The possibilities to make non-flat tilings with equilateral triangles are overwhelming, since starting with the elevation of the square tiling, we can add pairs of equilateral triangles between elevations of adjacent squares wherever we like. When we add pairs of equilateral triangles to the square tiling elevation in a regular way, we get the tiling shown in Figure 13. Because this structure is bendable, as shown in Figure 14, we can transform it into a cylindrical shape (Figure 15). Since all the tiles in these examples are equilateral triangles the tilings belong to the group of “deltahedra”. |
|
 |
|
 |
|
 |
|
|
|
|
|
Figure 11: Elevation of 3,3,3,3,3,3.
|
Figure 12: Squares elevated.
|
Figure 13: Transformation.
|
|
 |
|
 |
|
|
Figure 14: Bending.
|
Figure 15: Cylindrical tiling with equilateral triangles.
|
|
| 2.4. Cylinders - folding/unfolding. The method used in Figures 13 to 15 is just one way of creating cylindrical non-flat tilings with equilateral triangles. |
|
 |
 |
|
 |
|
 |
|
|
|
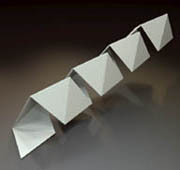
Figure 16: Tetrahelix.
|
|
Figure 17: Unfolding: plane.
|
Figure 18: Unfolding: strip.
|
|
 |
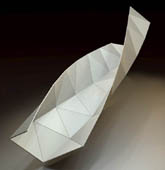
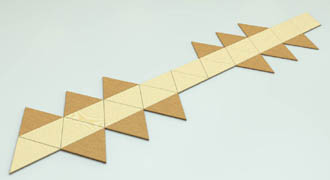
In Figure 16 we see the tetrahelix, one of the most simplest cylindrical non-flat tiling with equilateral triangles. The tetrahelix can be folded up from the normal flat tiling with triangles (Figure 17), but we can also start with a strip of triangles. Just spiralling around as in Figure 18, the strip of triangles will become a tetrahelix. A lot of interesting new shapes can be made by using this way of building non-flat tilings. Especially when we do not just use the simple strip but also allow adding extra triangles at each side, as in Figure 19. This strip is used to produce helical cylindrical shape of Figure 20. |
|
 |
 |
|
 |
|
|
|
|
|
Figure 19: Strip of triangles.
|
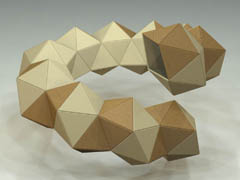
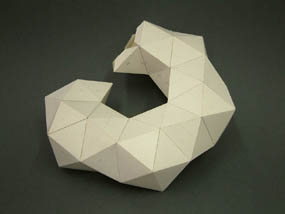
Figure 20: Helical cylinder.
|
|
| Many variations are possible. The examples shown in Figure 20 to 22 are all created by starting with a simple strip of triangles and then adding some extra triangles on each side. |
|
 |
|
 |
|
|
|
Figure 21, 22: Helical cylindrical tilings.
|
|
|
|
|
|
|
|
|
|
|
|
|
|
|
|
|
|
|
|
|
|
|
|
|
|
|